Create a Campaign - Legacy & Advanced Editors
Campaign Setup
Create a new email campaign using the steps below. From the Admin Control Panel, go to Campaigns > Create New or from the Campaign List, select Create a New Campaign link at the top right corner of the page. In the Campaign editor page, complete each field.

-
Campaign Type
The Campaign Type is determined by the type of target group create.
It will define the available merge fields for the subject line and body content
Select one of: Customers, Memberships, or Reservations.
-
Campaign Name
This is an internal name and not visible to the recipients.
Use a simple and consistent naming convention. Example: 2023 Oct Wine Club Red Only Remix - [year] [month] [Club Tier] [topic]
-
From Name
The Winery, Winery Principal, Wine Club Manager, etc.
-
From Email Address
The email address the campaign is being sent from. Must be a valid email address from your sending domain as indicated in the 'hint' (arrow in the image above).
A campaign launch summary will also be sent to this email address at the completion of launch.
-
Target Groups
Campaigns can only be sent to saved target recipient groups; these are created from the search tools.
Only saved groups that match the campaign type will be available.
Multiple target groups can be selected for one campaign and there is no limit to the amount of customers a single campaign can be sent to. (The larger the target group the longer all of the emails may be sent.)
For more information on how to set up target recipient groups, get instructions in this article.

-
Allow resend to same address
In most cases, you’ll want this setting to be left at No in order to prevent any customer from receiving an email more than once. If you want to relaunch the same campaign, then change this setting to allow resend.
This could be helpful if the target customer group is only recipients who did not open the first campaign sent.
A recurring campaign uses a dynamic target recipient group with the Allow Resend set to No. As new customers are added to the database and the group total increases, only new customers are sent the email campaign.
In the case of more than one target group that may contain some of the same customers, with this checked, only one email will be sent.
-
Send Frequency
A campaign can be launched to send only once, or created to send periodically on a recurring schedule. Select one: Once, Daily, Weekly, Monthly or Quarterly.
See this article for more information in recurring campaigns.
-
Launch Date
The date the campaign will send to the group of target customers.
Campaigns can be created and scheduled to launch days or months in advance. This is a great way to get a jump start on your annual marketing plan.
-
Launch Time
The time the campaign will send to the group of target customers. Don't forget AM/PM!
Must be scheduled at least 20 minutes prior to launch time.
-
Subject
This will be the subject line of the recipient's email. We recommend keeping it short and consise.
Use the available merge fields to call out personalized information, like the customer's name.
Avoid words that might get your email recognized as spam. Subject lines cannot contain any non-US-ASCII characters.

Email Content - Legacy WYSIWYG Editor

-
HTML Content
This is the body of the campaign. The toolbars in the HTML editor are consistent with common toolbar functions available in other text editing applications. This tool is called a WYSIWYG, which stands for what-you-see-is-what-you-get.
-
Plain Text Content
Once the content of the campaign is created, select all, and copy/paste the content into the plain text editor., removing links, Magic Links included.
This is a great fail-safe for any recipients that have selected to not receive HTML rich email content.
-
Select Wrapper
Select Wrapper: Learn more about wrappers in these articles -
Email Content - Advanced Editor


- Drag and drop the types of content you desire into a row or the general body of the email.
- Edit the Content, Blocks, or Body.
-
There are many design options, use the right margin to affect most of them.

The Advanced Editor allows for some very detailed design. If not used with some knowledge, similar to HTML (Legacy Editor) thing can become complicated.
Pro Tip: The messaging/design should start with mobile, and then expand for desktop.

Preview and Launch
-
Send Preview To
During the campaign workflow, send a preview of the email to yourself and/or your team before it’s officially sent to your customers. This step allows you to see the layout of the email, then edit before it’s launched.
Add up to 15 emails separated by commas to send a preview of the email campaign.
Each time SAVE is clicked, previews will be sent to any email addresses in this field.
This field may be left blank at anytime.
NOTE: Magic Links do NOT work in previews, only launched campaigns.

-
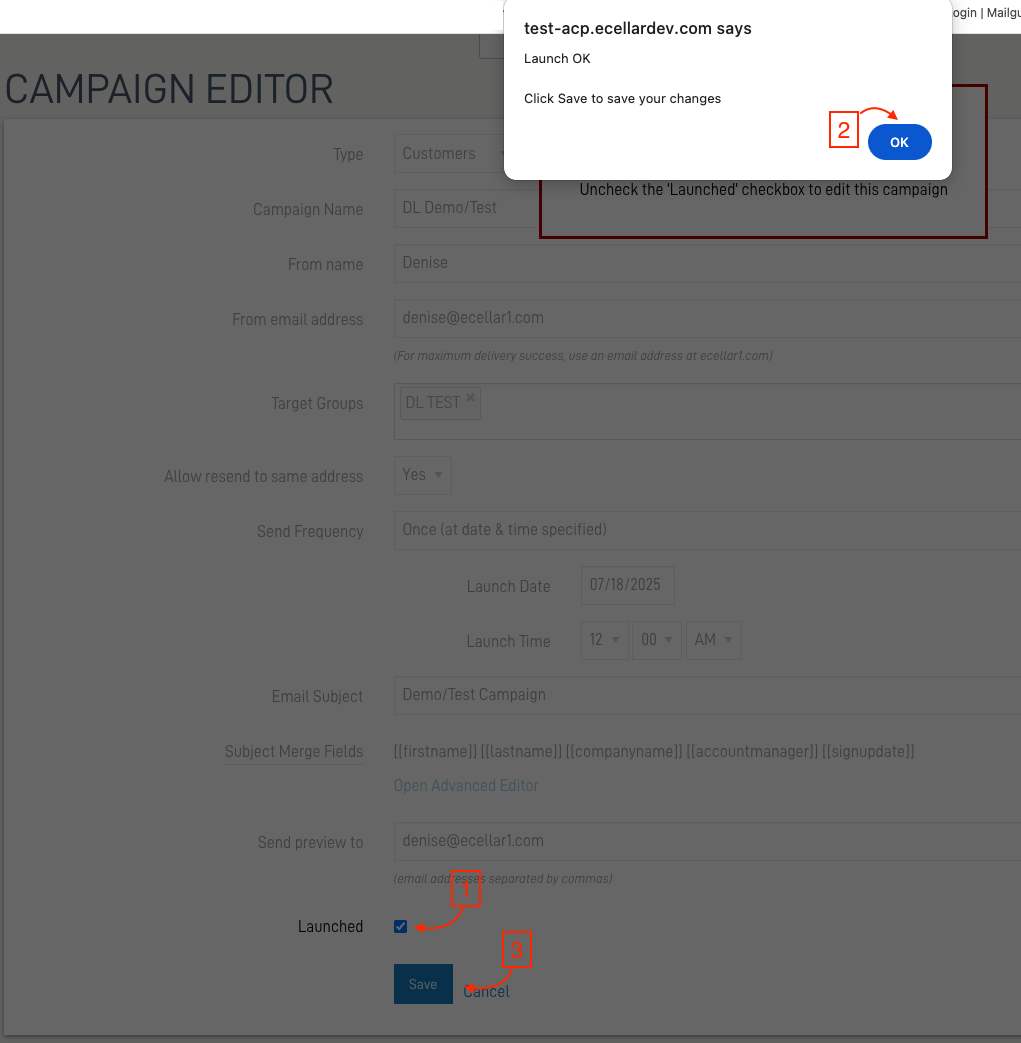
To Launch a Campaign
1. Check the Launched box
2. Confirm the popup message by clicking OK
3. Click SAVE.
Launching the campaign will initiate the process of sending the email to all customers in the target group at the scheduled date and time.
Once a campaign is in a launched state, it is locked for editing and cannot be changed, unless it's un-launched.
NOTE: Set the launch time for at least 20 minutes ahead of when you go through the process of launching.